Requests 库的使用
Python 的标准库 urllib 提供了大部分 HTTP 功能,但使用起来较繁琐。通常,我们会使用另外一个优秀的第三方库:Requests,它的标语是:Requests: HTTP for Humans。
Requests 提供了很多功能特性,几乎涵盖了当今 Web 服务的需求,比如:
- 浏览器式的 SSL 验证
- 身份认证
- Keep-Alive & 连接池
- 带持久 Cookie 的会话
- 流下载
- 文件分块上传
下面,我们将从以下几个方面介绍 Requests 库:
- HTTP 请求
- HTTP 响应
- cookie
- 会话对象
- 代理
- 身份认证
HTTP 请求
我们知道,一个 HTTP 请求由三部分构成:
- 请求行:包含请求方法(比如 GET, POST)、请求地址和 HTTP 协议版本
- 请求头:包含一系列的键值对
- 请求正文(可选)
如图所示:
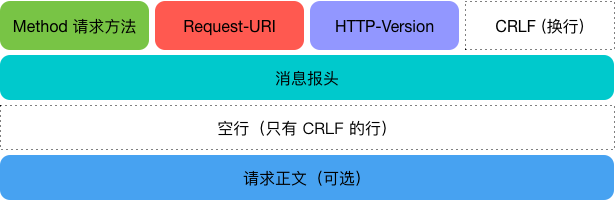
Requests 提供了几乎所有 HTTP 动词的功能:GET、OPTIONS、HEAD、POST、PUT、PATCH、DELETE,另外,它提供了 headers 参数让我们根据需求定制请求头。
使用 Requests 发送一个请求很方便,比如:
import requests

r = requests.get("http://httpbin.org/get")
r = requests.post("http://httpbin.org/post")
r = requests.put("http://httpbin.org/put")
r = requests.delete("http://httpbin.org/delete")
r = requests.head("http://httpbin.org/get")
r = requests.options("http://httpbin.org/get")
下面,我们重点讲一下 GET 请求,POST 请求和定制请求头。
GET 请求
使用 Requests 发送 GET 请求非常简单,如下:
import requests

r = requests.get("http://httpbin.org/get")
在有些情况下,URL 会带参数,比如 https://segmentfault.com/blogs?page=2,这个 URL 有一个参数 page,值为 2。Requests 提供了 params 关键字参数,允许我们以一个字典来提供这些参数,比如:
import requests

payload = {'page': '1', 'per_page': '10'}
r = requests.get("http://httpbin.org/get", params=payload)
通过打印该 URL,我们可以看到 URL 已被正确编码:
>>> print r.url
http://httpbin.org/get?per_page=10&page=1
需要注意的是字典里值为 None 的键不会被添加到 URL 的查询字符串中。
POST 请求
使用 Requests 发送 POST 请求也很简单,如下:
import requests

r = requests.post("http://httpbin.org/post")
通常,我们在发送 POST 请求时还会附上数据,比如发送编码为表单形式的数据或编码为 JSON 形式的数据,这时,我们可以使用 Requests 提供的 data 参数。
- 发送编码为表单形式的数据
通过给 data 参数传递一个 dict,我们的数据字典在发出请求时会被自动编码为表单形式,比如:
import requests

payload = {'page': 1, 'per_page': 10}
r = requests.post("http://httpbin.org/post", data=payload)
看看返回的内容(省略了部分数据):
>>> print r.text
{
  ...
  "form": {
    "page": "1",
    "per_page": "10"
  },
  ...
}
- 发送编码为 JSON 形式的数据
如果给 data 参数传递一个 string,我们的数据会被直接发布出去,比如:
import json
import requests

payload = {'page': 1, 'per_page': 10}
r = requests.post("http://httpbin.org/post", data=json.dumps(payload))
看看返回:
>>> print r.text
{
  "args": {},
  "data": "{\"per_page\": 10, \"page\": 1}",
  "files": {},
  "form": {},
  "headers": {
    "Accept": "*/*",
    "Accept-Encoding": "gzip, deflate",
    "Content-Length": "27",
    "Host": "httpbin.org",
    "User-Agent": "python-requests/2.9.1"
  },
  "json": {
    "page": 1,
    "per_page": 10
  },
  "origin": "13.75.42.240",
  "url": "http://httpbin.org/post"
}
在上面,我们自行对 dict 进行了编码,这种方式等价于使用 json 参数,而给它传递 dict,如下:
import requests

payload = {'page': 1, 'per_page': 10}
r = requests.post("http://httpbin.org/post", json=payload)
这种做法跟上面的做法是等价的,数据在发出时会被自动编码。
请求头
有时,我们需要为请求添加 HTTP 头部,我们可以通过传递一个 dict 给 headers 参数来实现。比如:
import requests

url = 'http://httpbin.org/post'
payload = {'page': 1, 'per_page': 10}
headers = {'User-Agent': 'Mozilla/4.0 (compatible; MSIE 5.5; Windows NT)'}

r = requests.post("http://httpbin.org/post", json=payload, headers=headers)
发送到服务器的请求的头部可以通过 r.request.headers 访问:
>>> print r.request.headers
{'Content-Length': '27', 'Accept-Encoding': 'gzip, deflate', 'Accept': '*/*', 'User-Agent': 'Mozilla/4.0 (compatible; MSIE 5.5; Windows NT)', 'Connection': 'keep-alive', 'Content-Type': 'application/json'}
服务器返回给我们的响应头部信息可以通过 r.headers 访问:
>>> print r.headers
{'Content-Length': '462', 'Server': 'nginx', 'Connection': 'close', 'Access-Control-Allow-Credentials': 'true', 'Date': 'Mon, 05 Dec 2016 15:41:05 GMT', 'Access-Control-Allow-Origin': '*', 'Content-Type': 'application/json'}
HTTP 响应
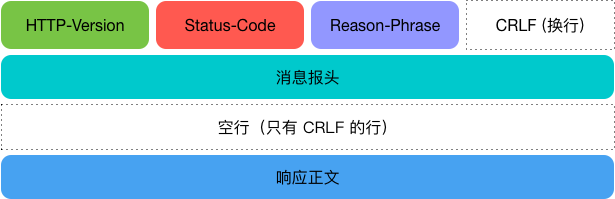
HTTP 响应与 HTTP 请求相似,由三部分组成:
- 状态行:包含 HTTP 协议版本、状态码和状态描述,以空格分隔
- 响应头:包含一系列的键值对
- 响应正文
如图所示:
当我们使用 requests.* 发送请求时,Requests 做了两件事:
- 构建一个 Request 对象,该对象会根据请求方法或相关参数发起 HTTP 请求
- 一旦服务器返回响应,就会产生一个 Response 对象,该响应对象包含服务器返回的所有信息,也包含你原来创建的 Request 对象
对于响应状态码,我们可以访问响应对象的 status_code 属性:
import requests

r = requests.get("http://httpbin.org/get")
print r.status_code

# 输出
200
对于响应正文,我们可以通过多种方式读取,比如:
- 普通响应,使用
r.text获取 - JSON 响应,使用
r.json()获取 - 二进制响应,使用
r.content获取 - 原始响应,使用
r.raw获取
普通响应
我们可以使用 r.text 来读取 unicode 形式的响应,看看例子:
import requests

r = requests.get("https://github.com/timeline.json")
print r.text
print r.encoding

# 输出
{"message":"Hello there, wayfaring stranger. If you’re reading this then you probably didn’t see our blog post a couple of years back announcing that this API would go away: http://git.io/17AROg Fear not, you should be able to get what you need from the shiny new Events API instead.","documentation_url":"https://developer.github.com/v3/activity/events/#list-public-events"}
utf-8
Requests 会自动解码来自服务器的内容,大多数 unicode 字符集都能被正确解码。
JSON 响应
对于 JSON 响应的内容,我们可以使用 json() 方法把返回的数据解析成 Python 对象。
看看例子:
import requests

r = requests.get("https://github.com/timeline.json")

if r.status_code == 200:
    print r.headers.get('content-type')
    print r.json()

# 输出
application/json; charset=utf-8
{u'documentation_url': u'https://developer.github.com/v3/activity/events/#list-public-events', u'message': u'Hello there, wayfaring stranger. If you\u2019re reading this then you probably didn\u2019t see our blog post a couple of years back announcing that this API would go away: http://git.io/17AROg Fear not, you should be able to get what you need from the shiny new Events API instead.'}
如果 JSON 解码失败,r.json() 就会抛出异常,比如:
import requests

r = requests.get("https://www.baidu.com")

if r.status_code == 200:
    print r.headers.get('content-type')
    print r.json()

# 输出
text/html
---------------------------------------------------------------------------
ValueError                                Traceback (most recent call last)
<ipython-input-3-9216431f0e2d> in <module>()
      1 if r.status_code == 200:
      2     print r.headers.get('content-type')
----> 3     print r.json()
      4
....
....
ValueError: No JSON object could be decoded
二进制响应
我们也可以以字节的方式访问响应正文,访问 content 属性可以获取二进制数据,比如用返回的二进制数据创建一张图片:
import requests

url = 'https://github.com/reactjs/redux/blob/master/logo/logo.png?raw=true'
r = requests.get(url)
image_data = r.content   # 获取二进制数据

with open('/Users/Ethan/Downloads/redux.png', 'wb') as fout:
    fout.write(image_data)
原始响应
在少数情况下,我们可能想获取来自服务器的原始套接字响应,这可以通过访问响应对象的 raw 属性来实现,但要确保在初始请求中设置了 stream=True,比如:
import requests

url = 'https://github.com/reactjs/redux/blob/master/logo/logo.png?raw=true'
r = requests.get(url, stream=True)
print r.raw
r.raw.read(10)

# 输出
<requests.packages.urllib3.response.HTTPResponse object at 0x1113b0a90>
'\x89PNG\r\n\x1a\n\x00\x00'
重定向
默认情况下,除了 HEAD,Requests 会自动处理所有重定向。我们可以使用响应对象的 history 属性来追踪重定向,Response.history 是一个 Response 对象的列表,这个对象列表按照从最老到最近的请求进行排序。
比如,点击某些网站的链接,它会将页面重定向到其他网站:
>>> import requests
>>> headers = {'User-Agent': 'Mozilla/4.0 (compatible; MSIE 5.5; Windows NT)'}
>>> r = requests.get('https://toutiao.io/k/c32y51', headers=headers)
>>> r.status_code
200
>>> r.url # 发生了重定向,响应对象的 url,跟请求对象不一样
u'http://www.jianshu.com/p/490441391db6?hmsr=toutiao.io&utm_medium=toutiao.io&utm_source=toutiao.io'
>>> r.history
[<Response [302]>]
>>> r.history[0].text
u'<html><body>You are being <a href="http://www.jianshu.com/p/490441391db6?hmsr=toutiao.io&utm_medium=toutiao.io&utm_source=toutiao.io">redirected</a>.</body></html>'
可以看到,我们访问网址 https://toutiao.io/k/c32y51 被重定向到了下面的链接:
http://www.jianshu.com/p/490441391db6?hmsr=toutiao.io&utm_medium=toutiao.io&utm_source=toutiao.io'
我们还看到 r.history 包含了一个 Response 对象列表,我们可以用它来追踪重定向。
如果请求方法是 GET、POST、PUT、OPTIONS、PATCH 或 DELETE,我们可以通过 all_redirects 参数禁止重定向:
>>> import requests
>>> headers = {'User-Agent': 'Mozilla/4.0 (compatible; MSIE 5.5; Windows NT)'}
>>> r = requests.get('https://toutiao.io/k/c32y51', headers=headers, allow_redirects=False)
>>> r.url # 禁止重定向,响应对象的 url 跟请求对象一致
u'https://toutiao.io/k/c32y51'
>>> r.history
[]
>>> r.text
u'<html><body>You are being <a href="http://www.jianshu.com/p/490441391db6?hmsr=toutiao.io&utm_medium=toutiao.io&utm_source=toutiao.io">redirected</a>.</body></html>'
Cookie
- 如果某个响应包含一些 cookie,我们可以直接访问它们,比如:
>>> import requests

>>> url = 'http://exmaple.com/some/cookie/setting/url'
>>> r = requests.get(url)

>>> r.cookies['some_key']
'some_value'
- 发送 cookies 到服务器,可以使用
cookies参数:
>>> import requests

>>> url = 'http://httpbin.org/cookies'
>>> cookies = dict(key1='value1')

>>> r = requests.get(url, cookies=cookies)
>>> r.text
u'{\n  "cookies": {\n    "key1": "value1"\n  }\n}\n'
>>> print r.text
{
  "cookies": {
    "key1": "value1"
  }
}
会话对象
我们知道,HTTP 协议是无状态的,这意味着每个请求都是独立的,如果后续的处理需要用到前面的信息,则数据需要重传,为了解决这个问题,我们可以使用 Cookie 或 Session 来存储某些特定的信息,比如用户名、密码等,这样,当用户在不同 Web 页面跳转或再次登录网站时,就不用重新输入用户名和密码(当然,如果 Cookie 被删除和 Session 过期则需要重新输入)。
Requests 提供了会话对象让我们能够跨请求保持某些参数,也可以在同一个 Session 实例发出的所有请求之间保持 Cookie。
下面,我们看看会话对象的使用。
下面是一个跨请求保持 Cookie 的例子:
>>> import requests
>>> s = requests.Session()
>>> s.get('http://httpbin.org/cookies/set/sessioncookie/123456789')
<Response [200]>
>>> r = s.get("http://httpbin.org/cookies")
>>> print r.text
{
  "cookies": {
    "sessioncookie": "123456789"
  }
}
会话还可用来为请求方法提供缺省数据,通过设置会话对象的属性来实现:
import requests

s = requests.Session()
s.auth = ('user', 'pass')
s.headers.update({'x-test': 'true'})

# x-test 和 x-test2 都会被发送
s.get('http://httpbin.org/headers', headers={'x-test2': 'true'})
代理
Requests 支持基本的 HTTP 代理 和 SOCKS 代理(2.10.0 新增功能)。
HTTP 代理
如果需要使用 HTTP 代理,我们可以为任意请求方法提供 proxies 参数,如下:
import requests

proxies = {
  "http": "http://10.10.1.10:3128",
  "https": "http://10.10.1.10:1080",
}

requests.get("http://example.org", proxies=proxies)
我们也可以通过设置环境变量 HTTP_PROXY 和 HTTPS_PROXY 来配置代理:
$ export HTTP_PROXY="http://10.10.1.10:3128"
$ export HTTPS_PROXY="http://10.10.1.10:1080"

$ python
>>> import requests
>>> requests.get("http://example.org")
SOCKS 代理
Requests 自 2.10.0 版起,开始支持 SOCKS 协议的代理,如果要使用,我们还需安装一个第三方库:
$ pip install requests[socks]
SOCKS 代理的使用和 HTTP 代理类似:
import requests

proxies = {
  "http": "socks5://user:pass@host:port",
  "https": "socks5://user:pass@host:port",
}

requests.get("http://example.org", proxies=proxies)
身份认证
大部分 Web 服务都需要身份认证,并且有多种不同的认证类型,比如:
- 基本身份认证
- 摘要式身份认证
- OAuth 认证
下面介绍一下基本身份认证和 OAuth 认证。
基本身份认证
基本身份认证(HTTP Basic Auth)是最简单的一种身份认证,一般需要身份认证的 Web 服务也都接受 HTTP Basic Auth,Requests 提供了非常简单的形式让我们使用 HTTP Basic Auth:
>>> from requests.auth import HTTPBasicAuth
>>> requests.get('https://api.github.com/user', auth=HTTPBasicAuth('user', 'pass'))
由于 HTTP Basic Auth 非常常见,Requests 提供了一种简写的形式:
requests.get('https://api.github.com/user', auth=('user', 'pass'))
OAuth 2 认证
OAuth 是一种常见的 Web API 认证方式,目前的版本是 2.0。Requests 并不直接支持 OAuth 认证,而是要配合另外一个库一起使用,该库是 requests-oauthlib。
下面以 GitHub 为例,介绍一下 OAuth 2 认证。
>>> # Credentials you get from registering a new application
>>> client_id = '<the id you get from github>'
>>> client_secret = '<the secret you get from github>'

>>> # OAuth endpoints given in the GitHub API documentation
>>> authorization_base_url = 'https://github.com/login/oauth/authorize'
>>> token_url = 'https://github.com/login/oauth/access_token'

>>> from requests_oauthlib import OAuth2Session
>>> github = OAuth2Session(client_id)

>>> # Redirect user to GitHub for authorization
>>> authorization_url, state = github.authorization_url(authorization_base_url)
>>> print 'Please go here and authorize,', authorization_url

>>> # Get the authorization verifier code from the callback url
>>> redirect_response = raw_input('Paste the full redirect URL here:')

>>> # Fetch the access token
>>> github.fetch_token(token_url, client_secret=client_secret,
>>>         authorization_response=redirect_response)

>>> # Fetch a protected resource, i.e. user profile
>>> r = github.get('https://api.github.com/user')
>>> print r.content
更多关于 OAuth 工作流程的信息,可以参考 OAuth 官方网站,关于 requests-oauthlib 库的使用,可以参考官方文档。
小结
- 任何时候调用 requests.*() 你都在做两件主要的事情。其一,你在构建一个 Request 对象, 该对象将被发送到某个服务器请求或查询一些资源。其二,一旦 requests 得到一个从 服务器返回的响应就会产生一个 Response 对象。该响应对象包含服务器返回的所有信息,也包含你原来创建的 Request 对象。